Architectural Shingles Nailing Pattern
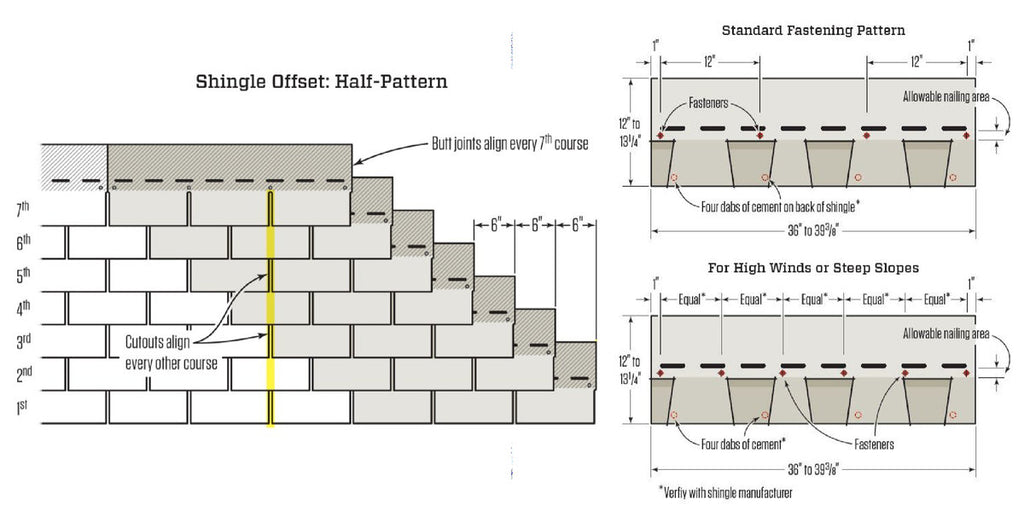
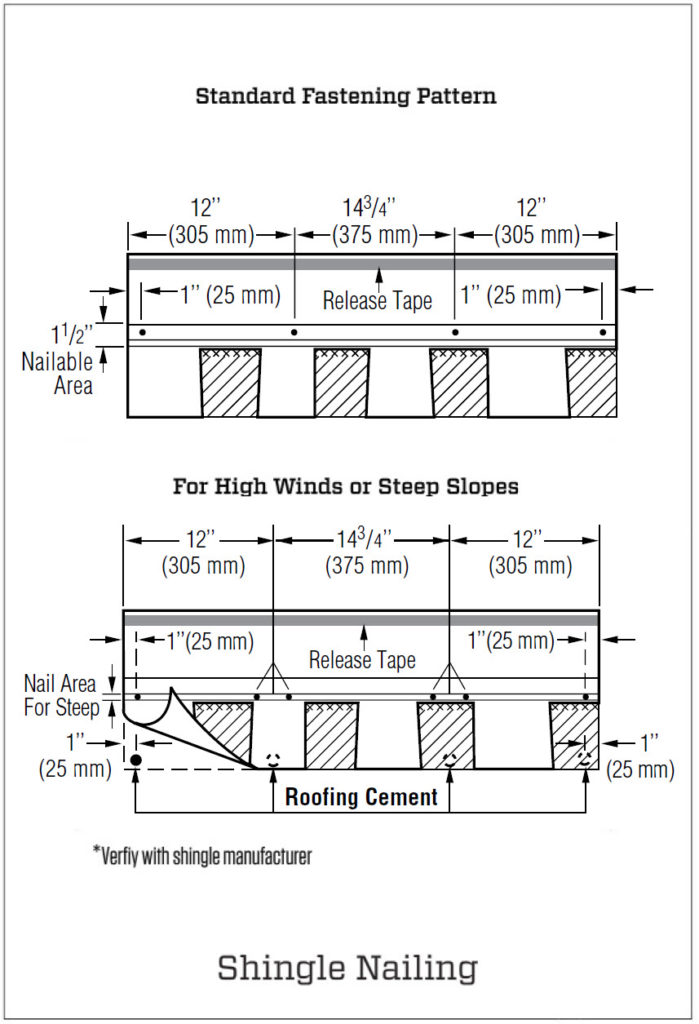
Architectural Shingles Nailing Pattern - Learn about selecting the correct type of shingles, nailing techniques, overlapping and aligning rows, and completing the installation with finesse. When installing shingles, there are specific areas of the roof where attention to detail is especially important. Architectural shingles, being thicker and heavier, require a bit more fastening. In most cases, 4 nails are adequate. Where the deck is less than 3/4 thick, the nails should be long enough to. Nail each shingle with four nails, positioning them just below the adhesive strip and near the edge. Tamko requires the use of nails as the method of application. This ensures they stay in place and don’t risk being exposed, which can cause corrosion and leaks. The diameter of roofing nails is usually gauged by “penny” units (denoted as “d”). Press shingle firmly into the adhesive. Nails should be long enough to penetrate 3/4 into the roof deck. Nail shanks should be made of minimum 12 gauge wire, and a minimum head diameter of 3/8. Web a large nailing area can make shingles easier and quicker to install while also increasing nail placement accuracy to help secure them better to the roof structure. Web most shingles require either a 4 or 6 nail pattern per shingle to ensure a tight seal. This chapter will demonstrate how to properly nail roofing shingles. Install the recommended number of nails per shingle. When it comes to installation, precision is key. For these shingles, roofers typically use six nails per shingle. Where the deck is less than 3/4 thick, the nails should be long enough to. In roofing, every shingle nail counts. Tamko requires the use of nails as the method of application. When installing shingles, there are specific areas of the roof where attention to detail is especially important. When installing thicker shingles, you may need to use a longer nail in order to penetrate the osb beneath fully. 4 specific areas to focus on. Web one of the key components. Web most shingles require either a 4 or 6 nail pattern per shingle to ensure a tight seal. If you're wondering how to nail roofing shingles quickly and accurately, try using shingles designed to make your job easier. Nail each shingle with four nails, positioning them just below the adhesive strip and near the edge. In most cases, 4 nails. Tamko requires the use of nails as the method of application. 4 specific areas to focus on. That's why gaf's timberline ® shingles with layerlock™ technology * were designed with the strikezone™ nailing area, the industry's largest nail zone. Where the deck is less than 3/4 thick, the nails should be long enough to. Gaf timberline hdz shingles with layerlock. Learn about selecting the correct type of shingles, nailing techniques, overlapping and aligning rows, and completing the installation with finesse. Nail each shingle with four nails, positioning them just below the adhesive strip and near the edge. When it comes to installation, precision is key. Standard type roofing nails should be used. Nail shanks should be made of minimum 12. Use a consistent nailing pattern across the roofing material to ensure uniformity and structural integrity. Nail each shingle with four nails, positioning them just below the adhesive strip and near the edge. Many manufacturers recommend a modified pyramid pattern where the offsets between shingles aren’t equal measurements but random themselves. In roofing, every shingle nail counts. For these shingles, roofers. This chapter will demonstrate how to properly nail roofing shingles. Use a consistent nailing pattern across the roofing material to ensure uniformity and structural integrity. The general rule is that a roofing nail should penetrate at least 3/4″ into the wooden deck beneath the shingle. Web nailing pattern for architectural shingles. Learn about selecting the correct type of shingles, nailing. Install the recommended number of nails per shingle. Nails should be long enough to penetrate 3/4 into the roof deck. Where the deck is less than 3/4 thick, the nails should be long enough to. Correctly line up the shingles to. The diameter of roofing nails is usually gauged by “penny” units (denoted as “d”). The purpose of this sample board is to show the proper nail position for three tab shingles. Web one of the key components to shingle performance, regardless of manufacturer, is proper nailing. For these shingles, roofers typically use six nails per shingle. Nail shanks should be made of minimum 12 gauge wire, and a minimum head diameter of 3/8. Web. Standard type roofing nails should be used. Nail shanks should be made of minimum 12 gauge wire, and a minimum head diameter of 3/8. The diameter of roofing nails is usually gauged by “penny” units (denoted as “d”). Web improve nail installation accuracy and speed. When it comes to installation, precision is key. Position the six nails per shingle according to the layout and installation instructions. Learn about selecting the correct type of shingles, nailing techniques, overlapping and aligning rows, and completing the installation with finesse. This ensures they stay in place and don’t risk being exposed, which can cause corrosion and leaks. Web a large nailing area can make shingles easier and. When installing shingles, there are specific areas of the roof where attention to detail is especially important. 4 specific areas to focus on. Use a consistent nailing pattern across the roofing material to ensure uniformity and structural integrity. Tamko requires the use of nails as the method of application. Web a large nailing area can make shingles easier and quicker to install while also increasing nail placement accuracy to help secure them better to the roof structure. Learn about selecting the correct type of shingles, nailing techniques, overlapping and aligning rows, and completing the installation with finesse. Web nailing pattern for architectural shingles. Where the deck is less than 3/4 thick, the nails should be long enough to. Standard type roofing nails should be used. When it comes to installation, precision is key. Web here’s the best way to install roof shingles, where to nail shingles, how much to overhang the drip edge, and fit the felt paper. Position the six nails per shingle according to the layout and installation instructions. When installing thicker shingles, you may need to use a longer nail in order to penetrate the osb beneath fully. The general rule is that a roofing nail should penetrate at least 3/4″ into the wooden deck beneath the shingle. Web architectural shingles, also known as laminated or dimensional shingles enhance the visual interest of a home. Install the recommended number of nails per shingle.
Roof Shingle LayOut and Nailing Patterns GutterBrush

Architectural Shingle Nailing Pattern The Architect

Nailing Pattern For Architectural Shingles Nail Ftempo

Proper Nailing Pattern For Architectural Shingles Nail Ftempo

Nailing Pattern For Architectural Shingles Nail Ftempo

The standard nailing for asphalt shingles is a fournail pattern, with

Nailing Pattern For Architectural Shingles Nail Ftempo

How to Shingle a Shed With 3 Tab and Architectural Shingles
Roof Shingle LayOut and Nailing Patterns GutterBrush
Where To Nail Shingles Architectural Nail Ftempo
This Ensures They Stay In Place And Don’t Risk Being Exposed, Which Can Cause Corrosion And Leaks.
This Chapter Will Demonstrate How To Properly Nail Roofing Shingles.
The Diameter Of Roofing Nails Is Usually Gauged By “Penny” Units (Denoted As “D”).
If You're Wondering How To Nail Roofing Shingles Quickly And Accurately, Try Using Shingles Designed To Make Your Job Easier.
Related Post: